Facebook remains a dominant force in the social media landscape with over 2.9 billion monthly active users. It's a powerful and free marketing tool for businesses. A crucial, yet often overlooked, aspect of Facebook marketing is the Facebook Business Manager. This platform allows you to manage your Facebook presence efficiently, from launching ads to handling messages, publishing posts, and integrating with other platforms like Instagram. Whether you're a solo entrepreneur or part of a large team, Facebook Business Manager keeps your business assets secure and organized. In this guide, we'll walk you through the steps to create a Facebook Business Manager account and make the most of this essential tool. Let's get started!
How To Set Up a Facebook Business Manager Account?
It is fairly simple to set up a Facebook Business Manager account. Let's see how you can do it step by step. Let's get started!
Step 1: Create a Facebook Business Manager Account
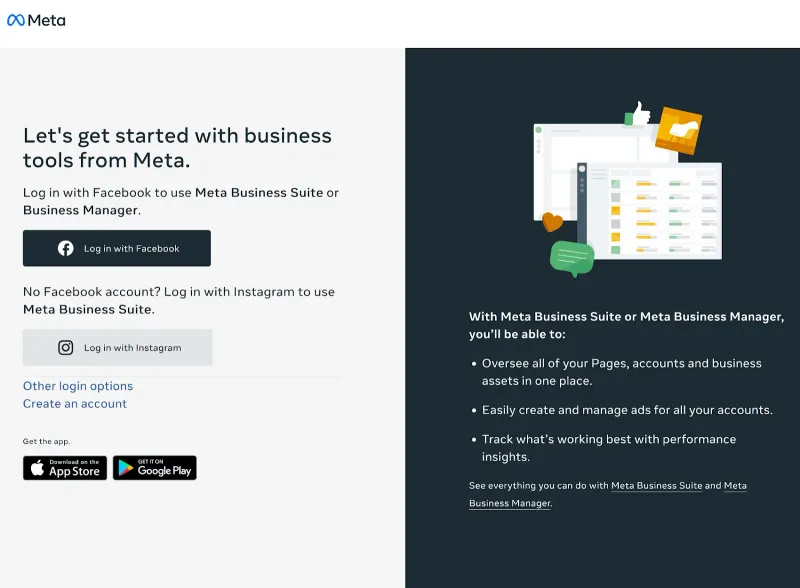
- Visit Meta Business Manager: Go to the Meta Business Manager website.
- Choose Your Login Option: Log in with Facebook, or Instagram, or create a new Facebook account.
- Log in with Facebook: For this guide, click “Log in with Facebook.”
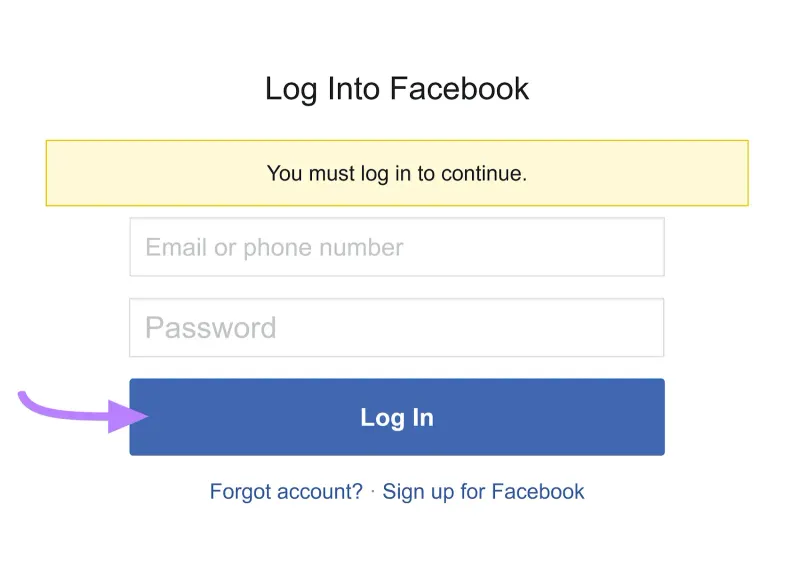
Step 2: Log Into Your Facebook Account
- Enter Your Facebook Account Information: Fill in your login details and click “Log in.”
Step 3: Enter Your Business Information
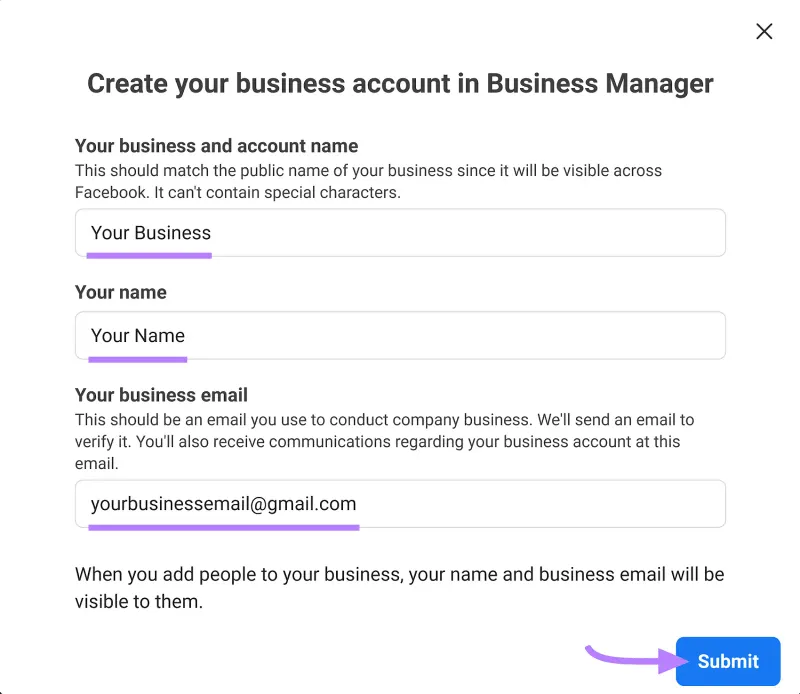
- Add Business Details: Enter your business name, account name, and business email address. Click “Submit.”
- Confirm Your Email: Check your email to confirm your address.
- Complete Additional Information: Add your business address, legal name, and website.
Step 4: Add Your Facebook Business Page
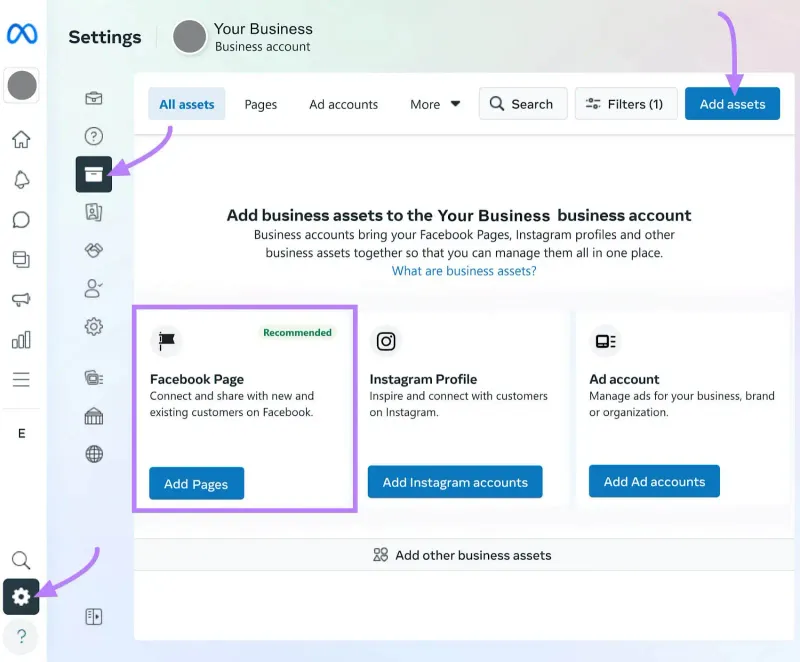
Navigate to Settings: Go to “Settings” then “Business assets.”
Add Assets: Click “Add assets” and select “Facebook Page.”
Choose an Option:
Create a New Facebook Page: Set up a new page to manage.

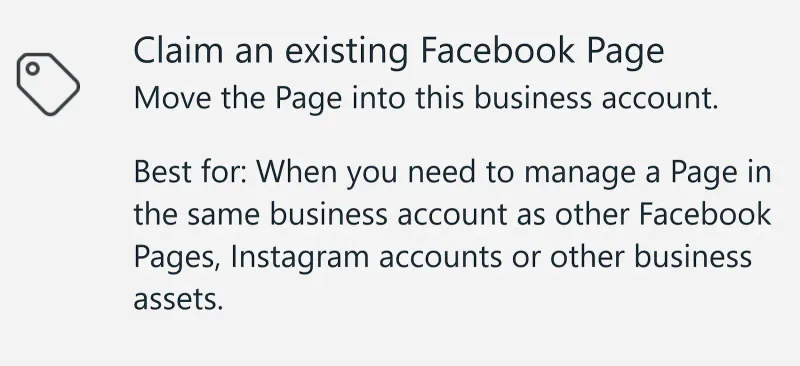
Claim an Existing Facebook Page: Claim a page you already manage.
Request to Share a Facebook Page: Request access to another person’s page (useful for agencies).

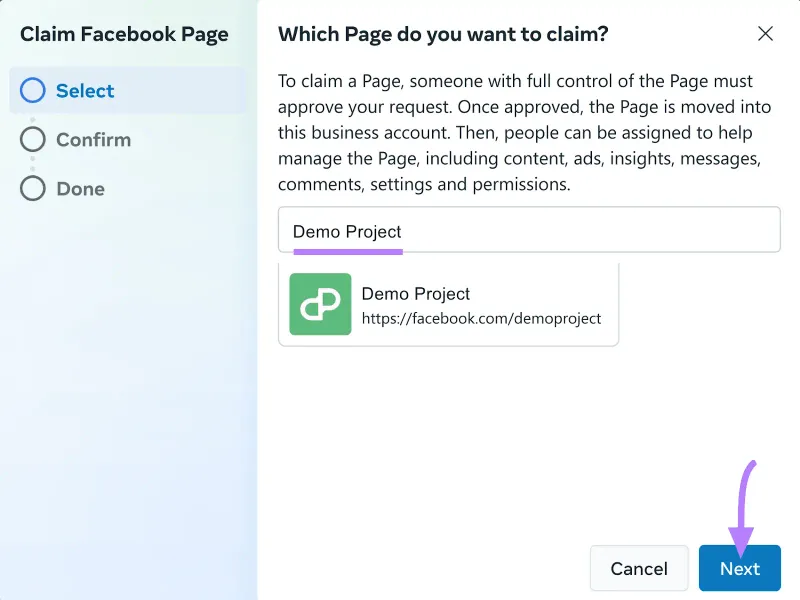
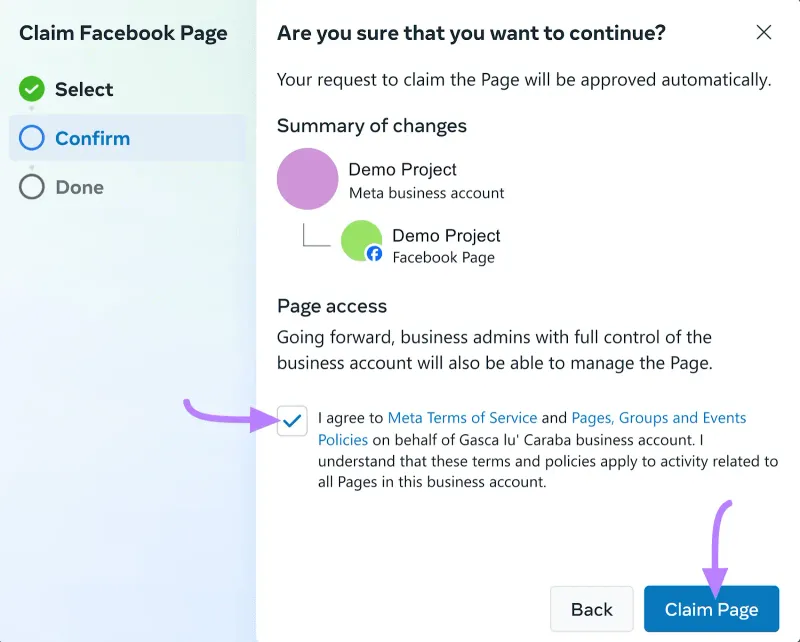
Claim a Page: For this example, select “Claim an existing Facebook Page,” enter the page name, click “Next,” confirm the terms, and click “Claim Page.”
Step 5: Invite Other Users
Go to Settings: Click on “Settings,” then “Invite people.”
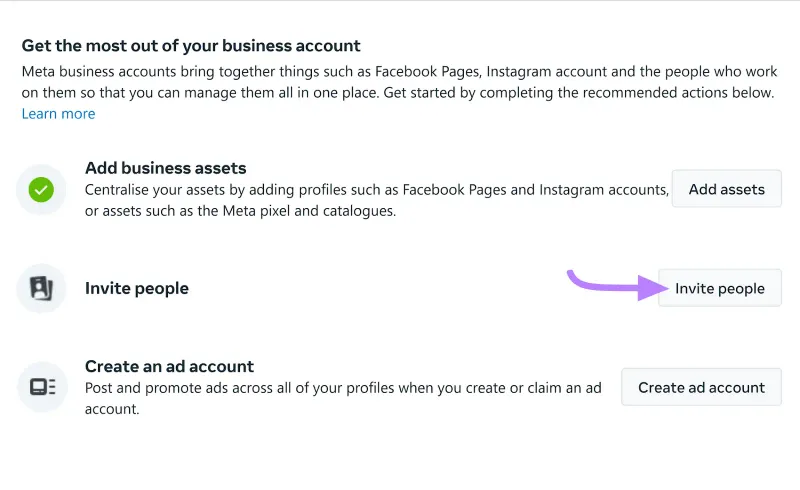
Invite People: Click “Invite people” in the top right corner.

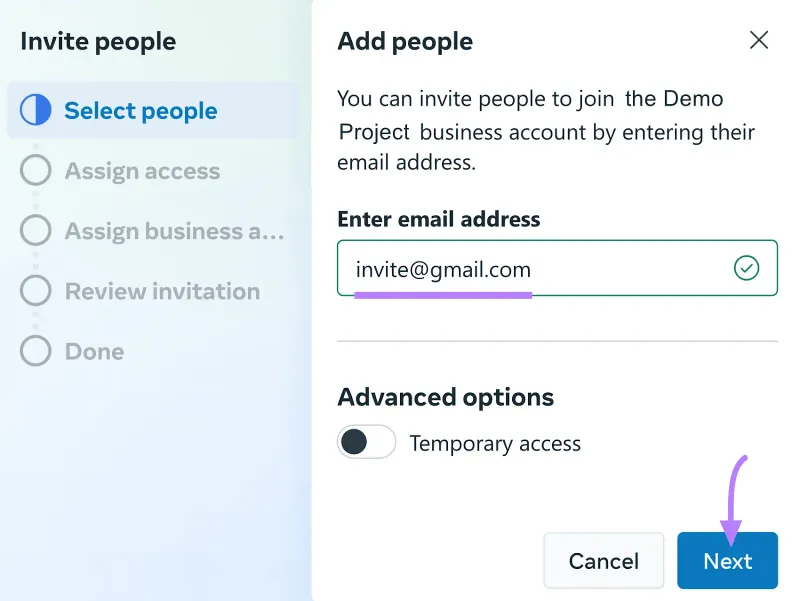
Enter Email Address: Add the email of the person you want to invite and click “Next.”
Set Access Level: Choose partial or full control. Assign specific duties like content creation or comment moderation.
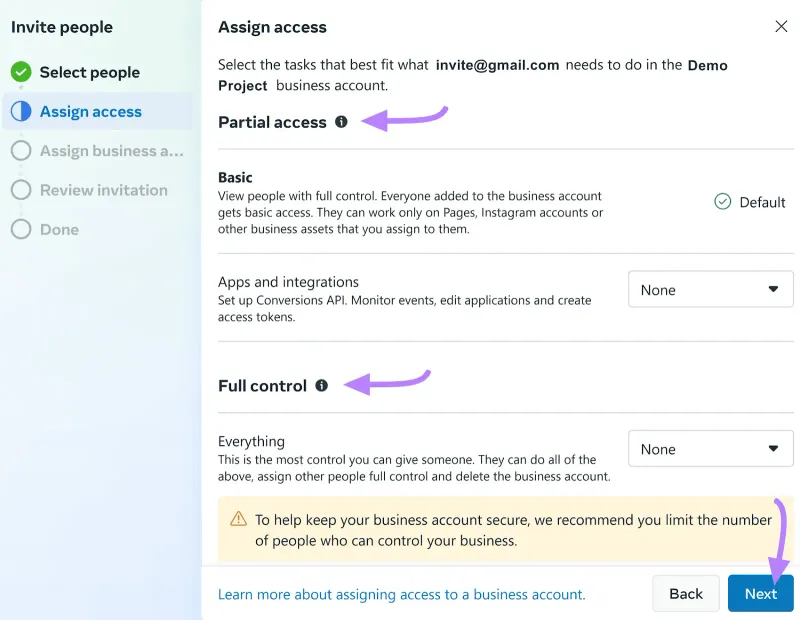
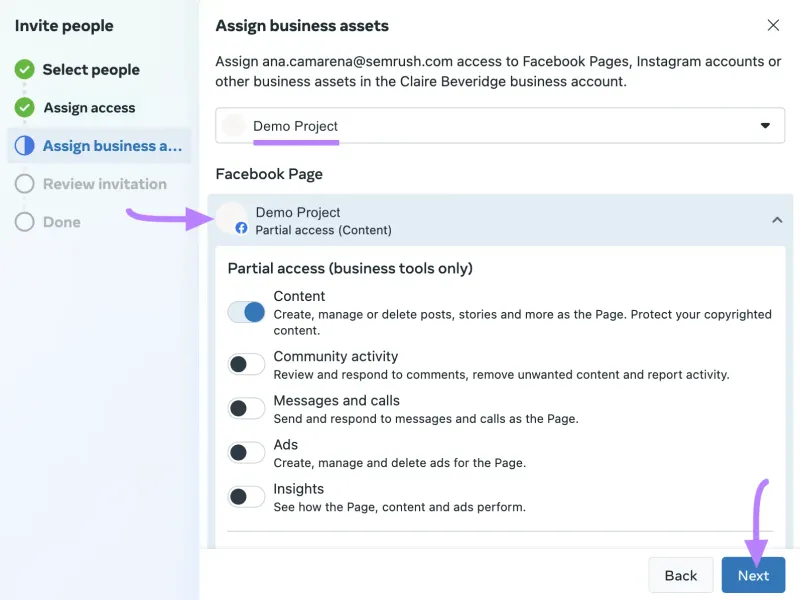
Assign Business Assets: Choose the assets and access levels for the user.
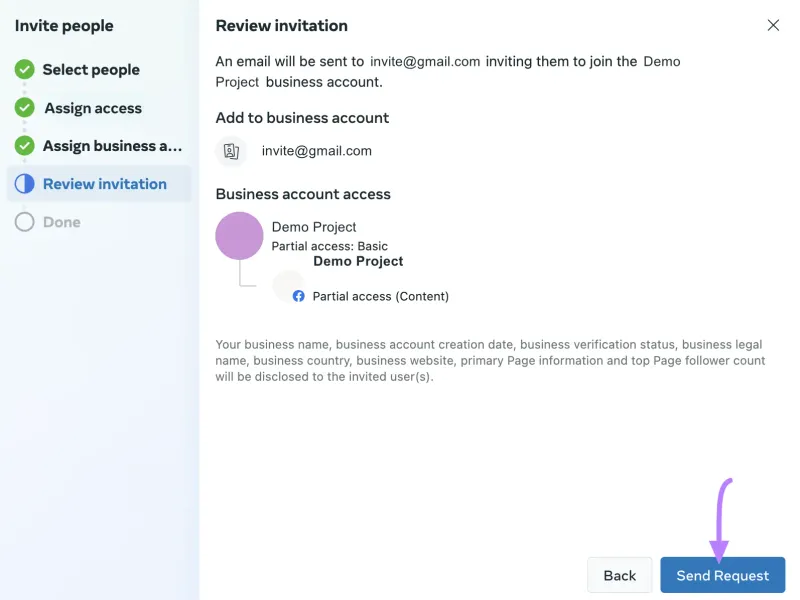
Send Invitation: Review the settings and click “Send Request.”
Step 6: Add Your Ads Manager Account
Navigate to Dashboard: Go back to your dashboard and click “Create ad account.”
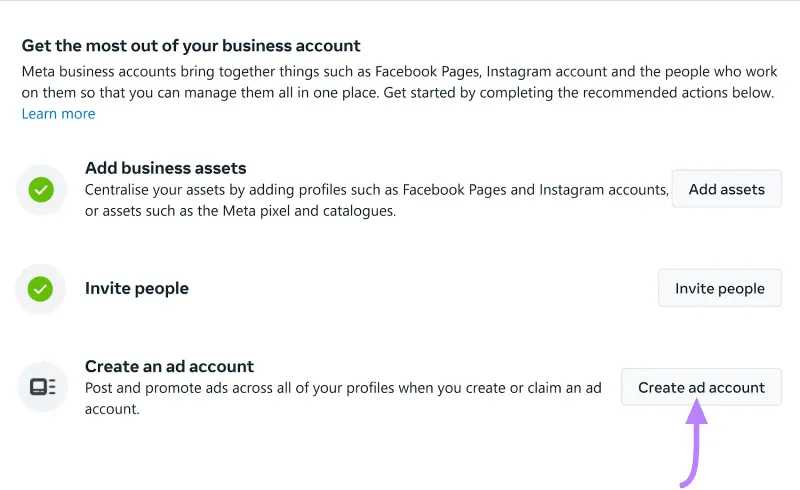
Choose an Option:
Create a New Ad Account: Set up a new account.
Claim an Existing Ad Account: Claim an account you manage.
Request to Share an Ad Account: Request access to another person’s account.
Enter Ad Account Details: Provide account name, time zone, and currency. Click “Next.”
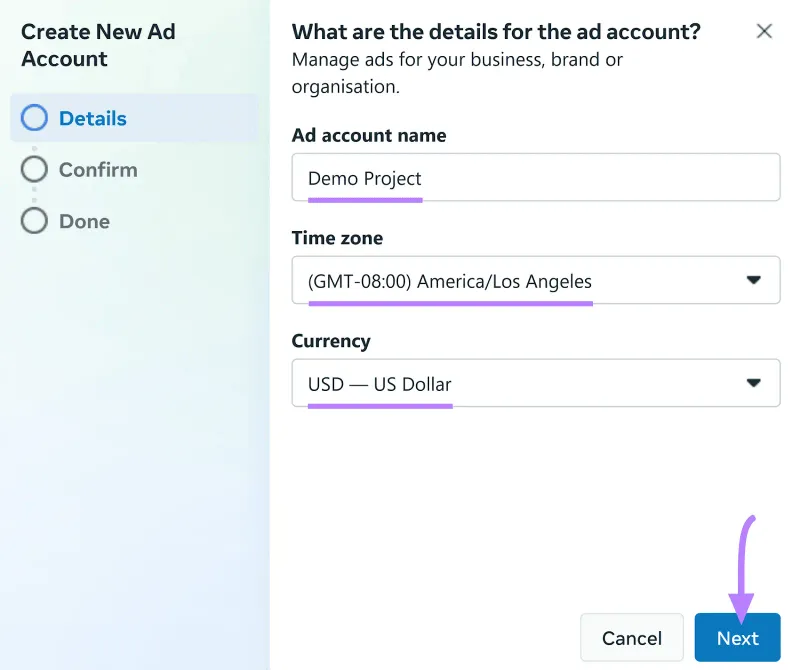
Agree to Terms: Accept the terms and conditions, click “Create Ad Account,” and enter your payment information.
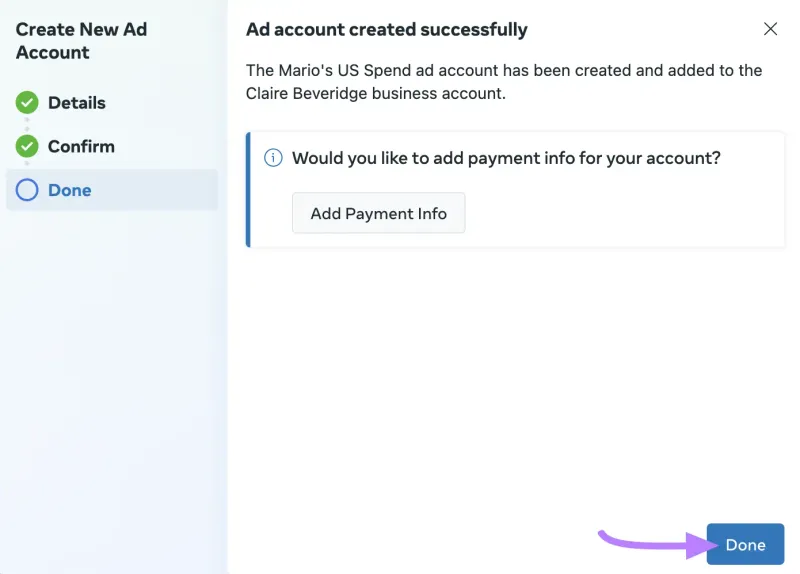
Complete Setup: Click “Done.”
Step 7: Set Up Your Meta Pixel
A Meta Pixel is a piece of code embedded in a website.
It tracks conversions, optimizes Facebook ads, creates targeted audiences, and remarkets to leads.
Utilize the Meta Pixel to:
- Show ads to the right people: Identify new potential customers and those who have interacted with your website (e.g., added items to the cart, clicked on product images, or made a purchase).
- Boost sales: Use automatic bidding to target customers more likely to buy.
- Measure results: Evaluate the effectiveness of your Facebook ads by tracking user actions.
Here’s how to set up your Meta Pixel:
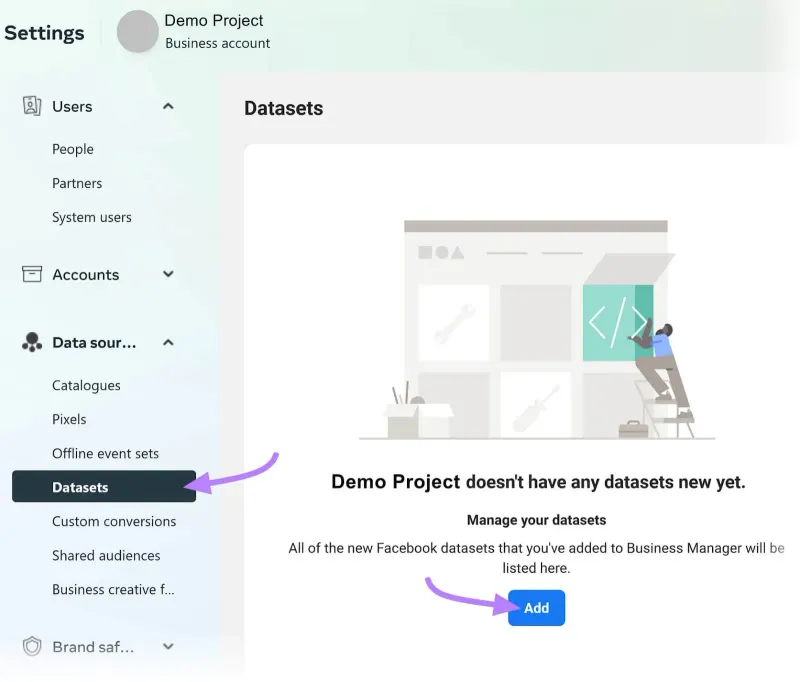
Go to Business Settings: Navigate to “Business settings” > “Data sources” > “Datasets.” Click “Add.”
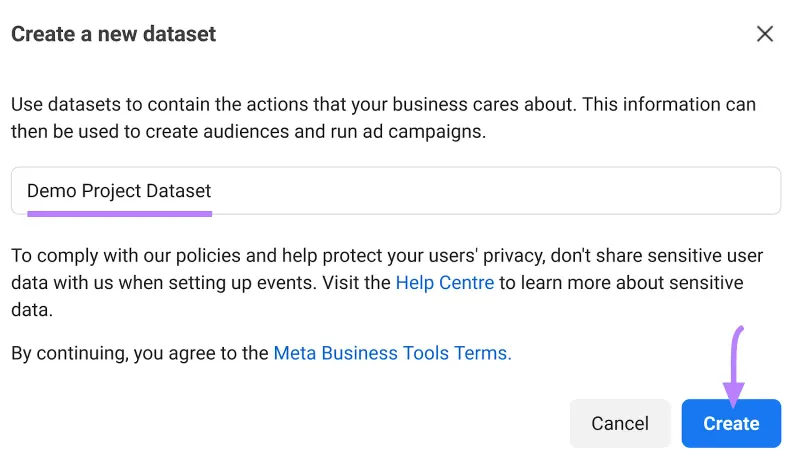
Create a Dataset: Name your dataset and click “Create.”
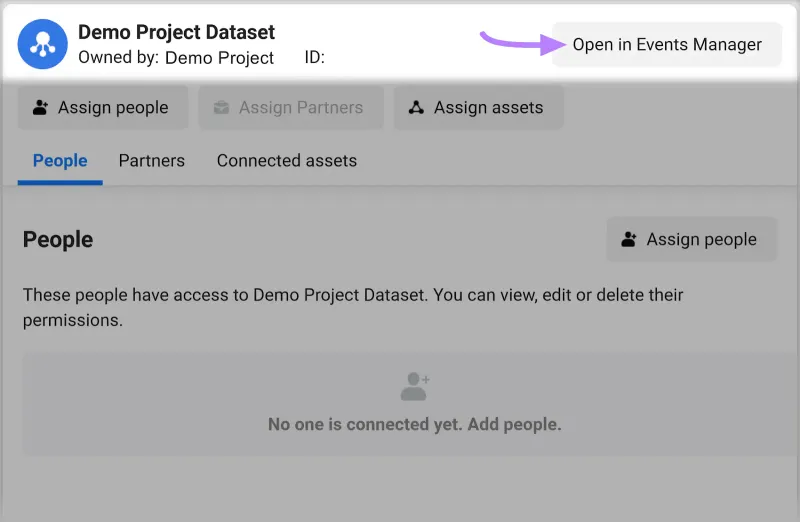
Open in Events Manager: Select the dataset and click “Open in Events Manager.”
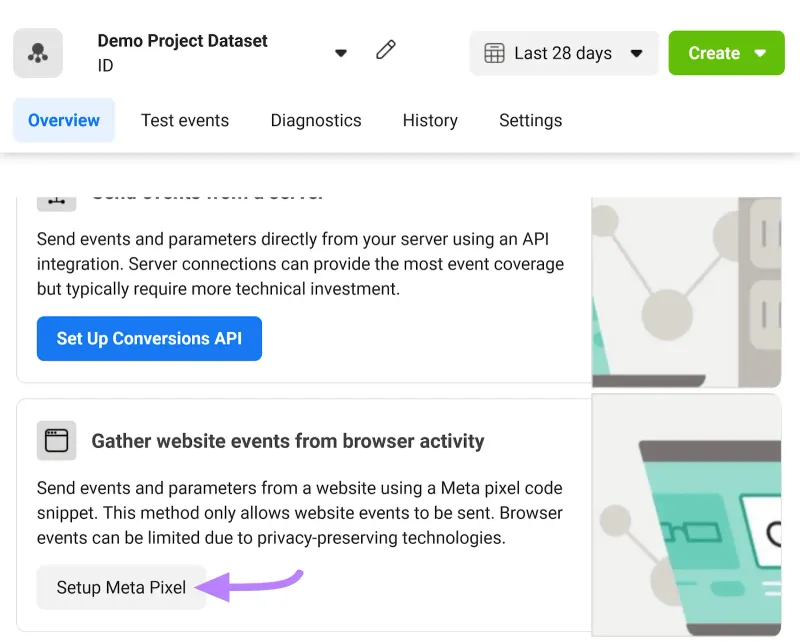
Set Up Meta Pixel: Scroll to “Gather website events from browser activity” and click “Setup Meta Pixel.”
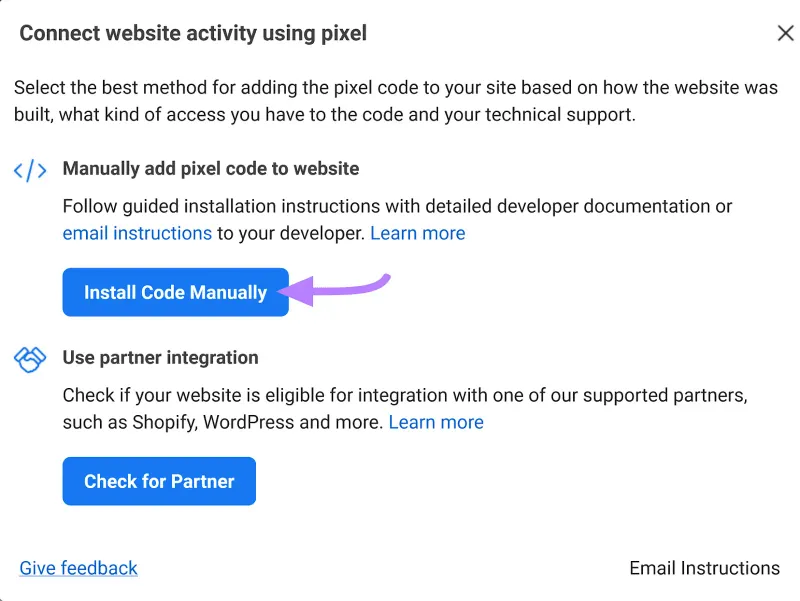
Choose Installation Method:
Install Code Manually: Copy the code and add it to your website’s HTML above the closing head tag.
Use Partner Integration: If available, use an integration to install the Pixel.
Copy Code: Click “Copy code” to copy the Pixel code to your clipboard.
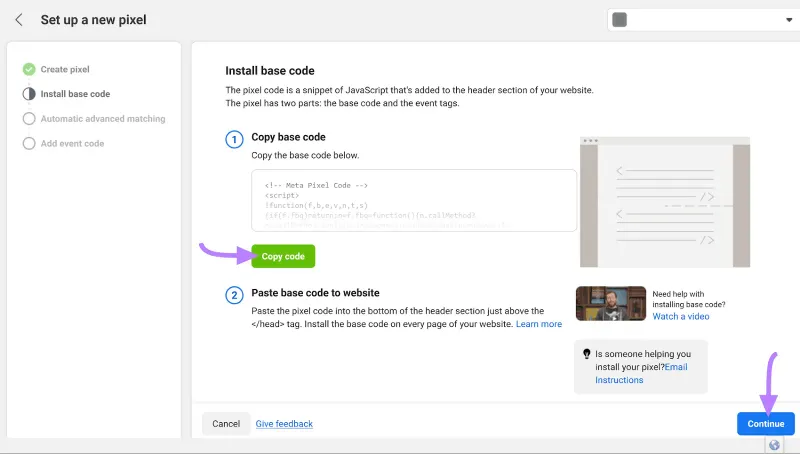
Add to Website: Paste the code into your website’s HTML.
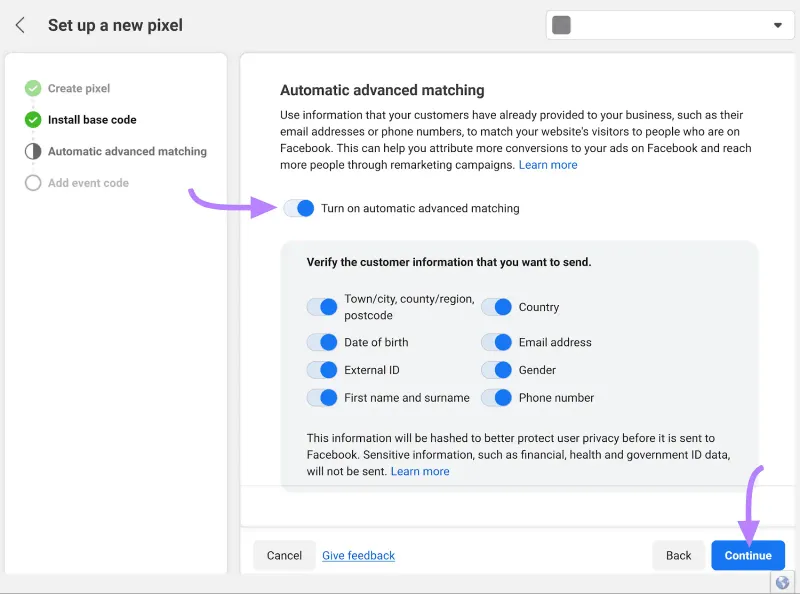
Continue Setup: Turn on “Automatic advanced matching” and click “Continue.”
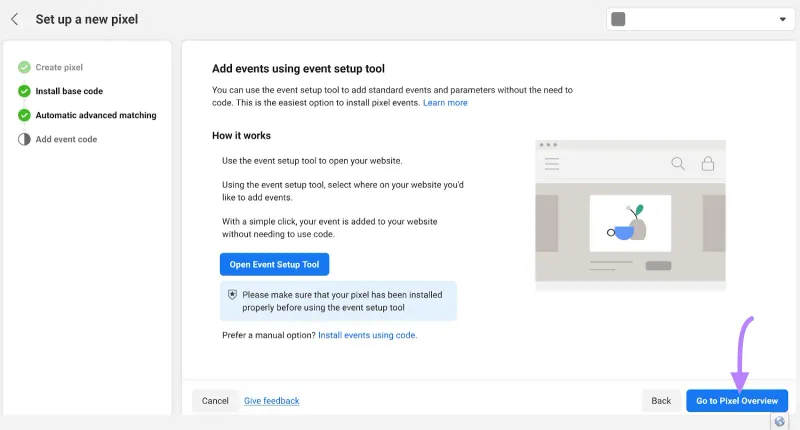
Go to Pixel Overview: Select “Go to Pixel Overview” and refresh the page if needed.
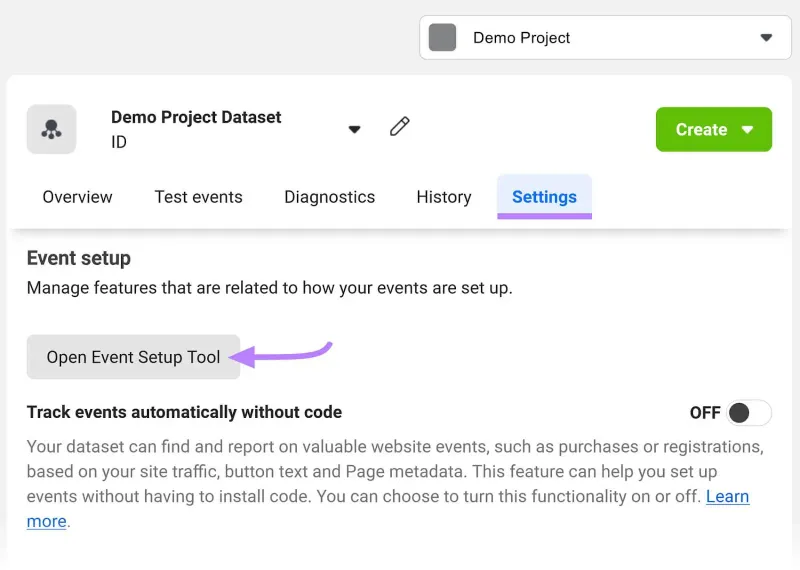
Set Up Events: In the “Settings” tab, scroll to “Event setup” and click “Open Event Setup Tool.”
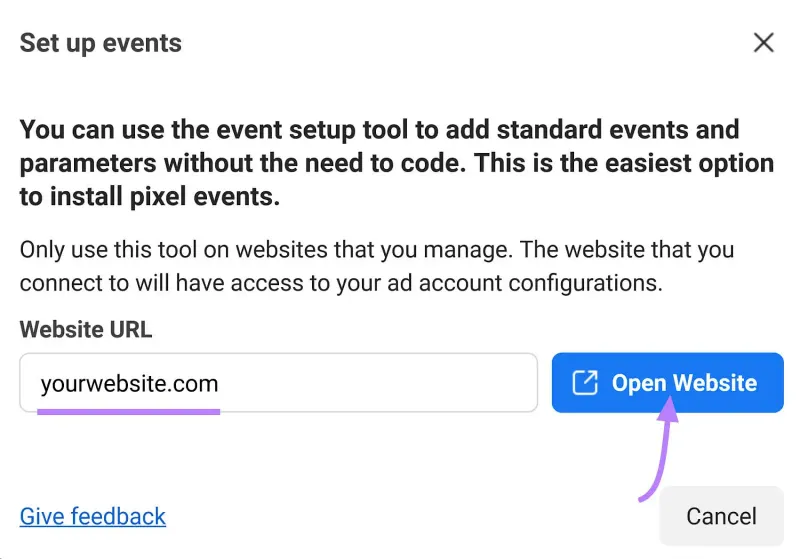
Enter Website Domain: Provide your website’s domain and click “Open Website.”
Frequently Asked Questions
Question: What’s the difference between Facebook Ads Manager and Facebook Business Manager?
Answer: Facebook Ads Manager is designed for creating, managing, and analyzing ad campaigns, while Facebook Business Manager is a broader platform for managing multiple Facebook pages, ad accounts, user permissions, and business assets in one place. Ads Manager focuses on ad campaign execution, whereas Business Manager provides centralized control and security for all your Facebook business activities.
Question: Can I use Facebook Business Manager without a personal Facebook account?
Answer: No, you need a personal Facebook account to create and manage a Facebook Business Manager account. However, your personal profile will remain separate from your business activities.
Question: How do I add people to my Facebook Business Manager account?
Answer: Go to "Business Settings," click on "People," then click "Add" and enter the email addresses of the people you want to add. Assign appropriate roles and permissions before sending the invitation.
Question: What is Facebook Pixel and why is it important?
Answer: Facebook Pixel is a snippet of code that you add to your website to track conversions, optimize ads, build targeted audiences, and remarket to people who have interacted with your site. It provides valuable data to improve your ad performance.
Question: Can I manage multiple Facebook pages with one Business Manager account?
Answer: Yes, Facebook Business Manager allows you to manage multiple Facebook pages, ad accounts, Instagram accounts, and other business assets from a single dashboard.
